Engineering our site: integrate Slack in WordPress

Written by Devhouse Spindle on 3rd April 2015
This is a post in a series of articles on how we engineered our website. First up: how to stay on top of comments on your blog by using WordPress and Slack.
When crafting the blog of this site readability was our focus. While sketching and coding the main parts, we had a few discussions on how to make the process of replying to comments as easy as possible. For us that meant integration with our internal communication tool: Slack.
The quickest responding team online
Because we offer the possibility to write comments on our articles, we want to respond to them as quickly as possible. So we decided to build an integration with Slack. When someone posts a comment on an article, the author of the article gets a DM in Slack with the comment and a URL to the article, so he can react immediately.
How we built it
Actually, it was easier than I thought. Slack already offers all kinds of possibilities for integrations, both incoming and outgoing. Just go to the Services page, hit “integrations” and add a webhook. With the “Webhook URL” you get there, all channels in Slack are open for your JSON POST requests.
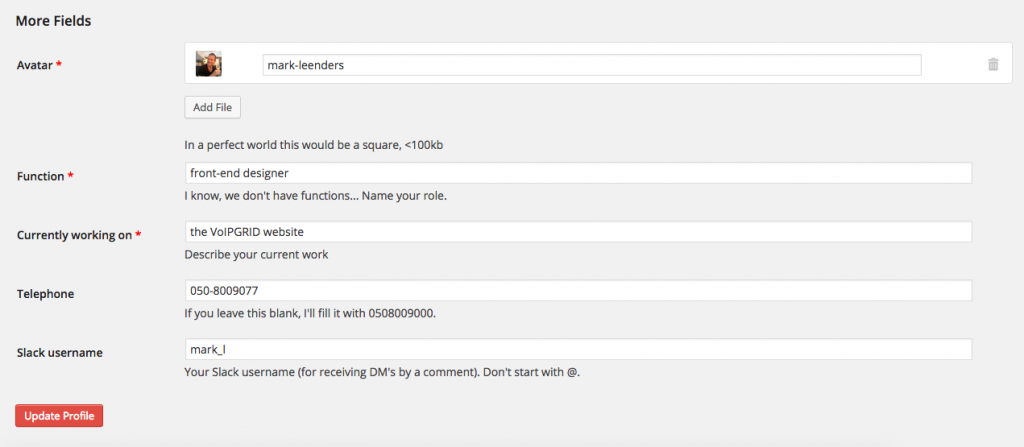
Adding a Slack username field in WordPress
Because WordPress is used as our CMS and I wanted Slack to send a DM to the author, I had to add an extra field to the user profile in WordPress. I’ve used Pods for that, which is an easy to use and free add-on that gives you the possibility to add extra fields to existing content types or create completely new types. In this case I added the field “slack_username” to Users.
The code
When WordPress processes a comment, it calls wp-comments-post.php. The ideal file for adding a few lines of code that makes the JSON POST request to Slack.
//Collect data from posted form. Already checked/trimmed by WP
 $name = $comment_author;
 $email = $comment_author_email;
 $message = $comment_content;
 $slack_username = $user->slack_username;
//API URL, this is where you need to add your own URL
$url = 'https://hooks.slack.com/services/*****';
//Initiate cURL.
$ch = curl_init($url);
//The JSON data.
$jsonData = array(
'channel' => $slack_username,
'username' => $name.' ('.$email.')',
'text' => 'Whoop whoop! You got a comment!\n\n'.$message.'\n\nGo to this article: '.$location
);
//Encode the array into JSON.
$jsonDataEncoded = json_encode($jsonData);
//Tell cURL that we want to send a POST request.
curl_setopt($ch, CURLOPT_POST, 1);
//Attach our encoded JSON string to the POST fields.
curl_setopt($ch, CURLOPT_POSTFIELDS, $jsonDataEncoded);
//Set the content type to application/json
curl_setopt($ch, CURLOPT_HTTPHEADER, array('Content-Type: application/json'));
//Execute the request
$result = curl_exec($ch);
?>
BAM! WordPress commments in Slack
That’s all there is to it. If you need help or want to know more, feel free to let WordPress send a DM to my Slack by adding a comment.

Your thoughts
Written by Josh Pollock on 3rd April 2015
Very cool idea, and +10 for using Pods. I did want to recommend that you use WordPress’ HTTP API for making the request. That will provide maximum compatibility and simplify your code.
You can replace everything after you created $jsonDataEncoded with:
$result = wp_remote_post( $url, array( ‘body’ => $jsonDataEncoded ) );
See: https://codex.wordpress.org/Function_Reference/wp_remote_post
Written by Mark Leenders on 3rd April 2015
Thanks… Also for the great suggestion. Definitely going to give that a try this weekend 🙂
Written by Charmain Maeno on 29th August 2016
Thank you for your article. Really Cool.